Easy to use or not? Price can be acceptable? Compatible with computer OS? Whether to customize the recording setting? Only recording with microphone sound or system sound? It can be edited after recording? …
To solve the problems above, FonePaw Screen Recorder should be selected since it is a professional recording utility and does well in Windows and Mac screen recording, which supports Windows 10/8/7 (32 bit or 64 bit) and macOS 10.9 or above, even macOS Catalina.
It provides many fantastic features to ease your life in a recording.
Video capturing: Customize the region to begin to capture the desktop activities: app operation, playing video, online class and more. Audio recording: Both sounds from systems and microphones are supported to record. Webcam recording: Record your webcam video only or along with screen activity. Take a screenshot: Capture a snapshot from the recording video or desktop in one click. Annotate the video/screenshot: Add some notes to mark key points in the recording withdrawing or adding texts, arrows. Export to multiple formats: Most formats are supported, like MP4, MOV, WMV, AVI and more. Scheduled recording: Software will boot automatically if setting up the starting and stopping time or record length in Task Scheduler. GIF maker: Export the recording as a GIF image and set up its frame rate. Others: There are also some minor features, e.g.: set up hotkeys, rename recordings, set up the output quality, share or delete the items.
No Skills Required! Capture Screen Activities on Windows or Mac
Only with 4 steps, you will get a video recording on your computer. The recording process with FonePaw Screen Recorder on Windows is the same as recording on Mac.
Step 1: Download and Install FonePaw Screen Recorder
For Windows users: https://www.fonepaw.com/downloads/screen-recorder.exe For Mac users: https://www.fonepaw.com/downloads/mac-screen-recorder.dmg After downloading the software, launch it on your PC. Then, select the recording type to get started, e.g: Video Recorder or Audio Recorder.
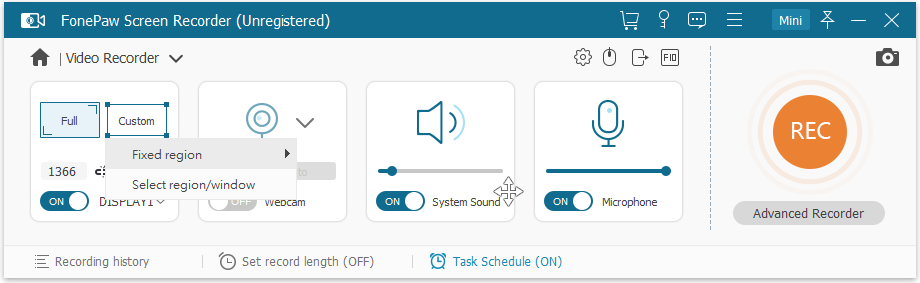
Step 2: Customize Your Settings
When you choose Video Recorder, custom the recording area and adjust the sound to begin. In addition, it is possible to set up the output settings: output format, video quality, frame rate, etc. in Preferences. Or you are able to capture with a webcam if you toggle it on.
Note: In Video Recorder feature, there is an option under the REC button – “Advanced Recorder” which will let you customize the recording window: follow the mouse, lock certain webpage (like YouTube window) to record and more. When you select Audio Recorder, you can record the system sound or microphone or both of them. The volume can be set up by yourself.
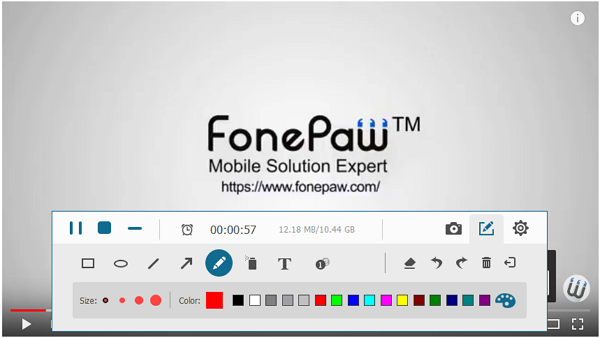
Step 3: Capture Your Screen
As you have set up everything, click the REC button to get started. (Hotkey also can help begin and stop recording.) During the recording, you are able to add some notes to the video or screenshot. Adding texts, arrows, lines, circles can be used for annotation. If you are not satisfied with the annotation, you can undo or delete them.
Step 4: Preview and Save the Recording
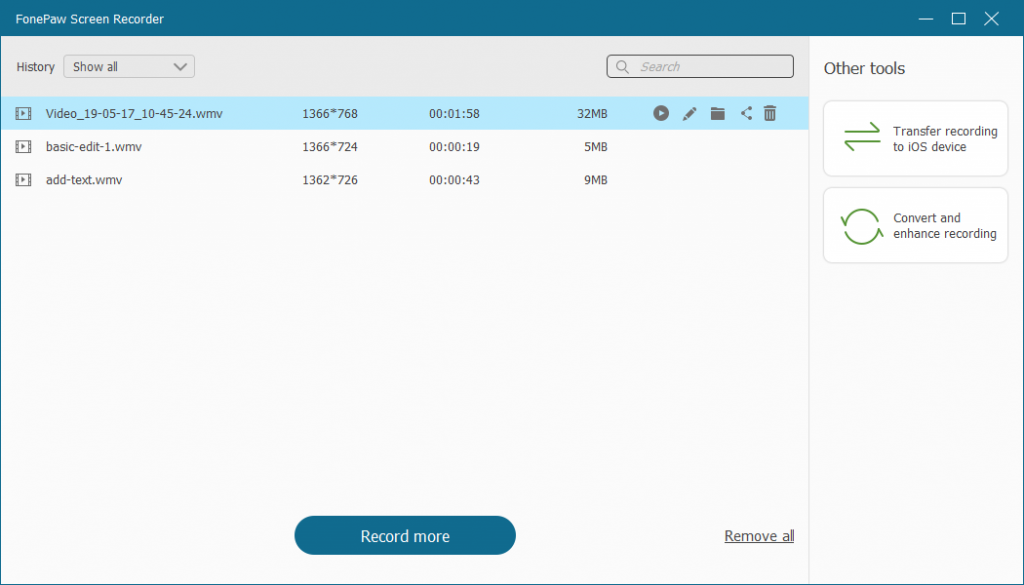
When you stop recording, there will come with a preview window for you. Check the video or audio recording and you can simply cut it as you like. If you think it is OK, click the “Save” button and it will be saved in the preset path. The re-record button allows you to capture again if the first recording is not good. After saving, FonePaw Screen Recorder offers some functions for you:
Play the recording; Rename the item; Open it in the folder; Share to social media; Delete from the computer.
Conclusion:
The whole process doesn’t cost too much effort. If you want an easier capturing method, the Task Schedule feature can work for you. Just set it up and the FonePaw program will boot automatically on time to record what you need, which will simplify your life greatly. Moreover, there is a free trial version of FonePaw Screen Recorder so you can experience the recording process at first and it will save the 3-minute recording for previewing. For purchasing, it offers two licenses for both Windows and Mac version: Single-user license for one user and Family license for 5 users. Both of them can be used for a lifetime. Why not try?